

10 min read
Passive range of motion (PROM) exercises move a joint through its full range using an external force — a coach, therapist, or partner without any active muscle engagement from the client. They are used in post-surgical recovery, neurological rehabilitation, injury management, and athletic recovery to maintain joint mobility, prevent contractures, and lay the groundwork for active movement.
This guide covers a clear definition of PROM, a clinical dosage framework, 10 step-by-step exercises for the lower and upper body, safety contraindications, and a progression model from PROM to full active ROM.
What Are Passive Range of Motion Exercises? (Definition)
Passive range of motion (PROM) exercises move a joint through its available range using an external force a physical therapist, coach, partner, or machine without any active muscle effort from the person being treated. The client stays completely relaxed. Their muscles do not initiate, guide, or control the movement at any point. This is what separates PROM from active and active-assisted ROM: the joint moves, the soft tissues are stretched and lubricated, and the benefits are delivered even when the client is physically unable to move on their own.
This is what makes PROM different from other types of mobility work: it allows joints and soft tissues to be moved safely, even when the individual cannot do it themselves.
To understand where PROM fits in rehabilitation and mobility training, it helps to compare the three types of range of motion.
For a deeper look at how these two types of movement are programmed together, see our guide on active vs passive range of motion.
Who Should Use Passive Range of Motion Exercises?
Passive range of motion exercises are appropriate for a wide range of clients and recovery scenarios:
Post-surgical clients: After procedures like knee replacement, hip replacement, or shoulder surgery, muscles are often too weak or restricted to move independently. PROM keeps joints mobile during the early stages of healing and reduces the risk of scar tissue restricting movement long-term.
Clients with neurological conditions: Stroke, spinal cord injury, multiple sclerosis, and Parkinson's disease, can limit or eliminate voluntary muscle control. PROM maintains joint health and soft-tissue flexibility for these individuals, even when active movement is not possible.
Elderly or immobile clients: Extended bed rest, reduced activity, or age-related mobility decline can lead to joint contractures (permanent shortening of a muscle or tendon). Regular PROM sessions prevent this deterioration and preserve the quality of movement.
Athletes in recovery: After acute injuries, heavy training loads, or competitive seasons, athletes can use PROM as a low-effort method to maintain joint mobility, reduce stiffness, and support tissue recovery without creating additional stress on healing structures.
Anyone with a significant ROM gap: The ROM gap is the difference between a joint's passive range (how far it can be moved) and its active range (how far the individual can move it on their own). A large gap signals potential instability and injury risk. PROM training helps gradually close that gap.
To learn more about how passive movement is used in physiotherapy and clinical recovery settings, see our dedicated guide.
5 Key Benefits of Passive Range of Motion Exercises
Consistent PROM programming delivers meaningful physical benefits, including:
- Prevents joint contractures: When joints remain immobile for extended periods, muscles and connective tissues shorten and stiffen permanently. PROM gently moves tissues through their available range, preventing shortening.
- Reduces stiffness and improves circulation: Gentle, rhythmic movement stimulates blood flow to the joint and surrounding soft tissues, reducing swelling, flushing metabolic waste products, and accelerating healing.
- Maintains synovial fluid circulation: Synovial fluid lubricates cartilage and keeps joint surfaces healthy. Without movement, this fluid becomes less effective. PROM keeps the joint lubricated and nourished even during periods of restricted activity.
- Prepares the body for active rehabilitation: By maintaining tissue length and joint mobility, PROM creates the foundation for progressing to active ROM exercises later in recovery. It is the first step in the mobility-to-strength continuum.
- Reduces pain and discomfort: Gentle motion calms the nervous system, reduces edema, and decreases joint pain, particularly in the early stages following injury or surgery.
Dosage Guide: How Often and How Long
Always consult a qualified healthcare professional or physical therapist before beginning PROM exercises with a client who has an injury, post-surgical condition, or medical diagnosis. Effectiveness and appropriate loading will vary by individual.
10 Passive Range of Motion Exercises
Lower Body
1. Supine Hamstring Stretch
Focus: Hamstrings and posterior hip
Starting Position: Client lies on their back with legs extended flat on the surface.
Execution:
- Support the client's leg with one hand behind the knee and one at the heel.
- Slowly raise the leg with the knee extended until resistance is felt.
- Hold at the point of mild tension for 20 to 30 seconds.
- Lower the leg slowly and repeat.
Coach Tip: Keep the non-working leg pressed gently into the surface to prevent the pelvis from rotating. Never force the leg past resistance.
2. Supine Hip Flexor Stretch
Focus: Hip flexors and anterior thigh
Starting Position: Client lies on their back with legs extended.
Execution:
- Gently bend the client's knee and bring it toward their chest.
- Use one hand on the knee and one at the ankle for control.
- Hold at the point of mild stretch.
- Slowly return the leg to the starting position.
Coach Tip: Watch for excessive pelvic tilt or lower back arching, which signals you have pushed beyond the available range.
3. Piriformis Stretch (Figure-4)
Focus: Glutes, deep hip rotators, and piriformis
Starting Position: Client lies on their back with knees bent, feet flat.
Execution:
- Cross one ankle over the opposite knee to form a figure-4 shape.
- Gently guide the uncrossed thigh toward the client's chest until a deep stretch is felt in the crossed-leg glute.
- Hold for 30 to 60 seconds.
- Repeat on the other side.
Coach Tip: This drill targets the piriformis effectively and can relieve pressure on the sciatic nerve. Progress depth gradually across sessions.
4. Side-Lying Quad and Hip Flexor Stretch
Focus: Quadriceps and hip flexors
Starting Position: Client lies on their side with the lower leg slightly bent for stability.
Execution:
- Gently hold the top ankle and bring the heel toward the glute.
- Apply light pressure to maintain the stretch without forcing the range.
- Ensure the lower back does not arch and the torso does not rotate.
- Hold for 20 to 30 seconds.
Coach Tip: This counteracts the effects of prolonged sitting and is particularly valuable for desk-based clients and athletes with tight hip flexors.
5. Butterfly Groin Stretch (Adductor PROM)
Focus: Inner thighs (adductors) and groin
Starting Position: Client sits upright with the soles of their feet together, knees falling out to the sides.
Execution:
- The client relaxes the legs completely.
- Place gentle downward pressure on the knees and guide them slowly toward the floor.
- Do not force or bounce. Work only within the available range.
- Hold at the end range for 20 to 30 seconds.
Coach Tip: Tight adductors restrict deep squatting and lateral movement. This drill is a high-value addition to programs for athletes and general fitness clients alike.
6. Knee-to-Chest Stretch
Focus: Lower back decompression and glutes
Starting Position: Client lies on their back with legs extended.
Execution:
- Grasp one knee with both hands and draw it gently toward the chest.
- Keep the opposite leg relaxed and extended.
- Hold for 20 to 30 seconds, then switch sides.
Coach Tip: This compresses the hip capsule gently and relieves lumbar tension. It is safe for most clients and is an excellent starting exercise early in recovery sessions.
7. Supine Hip Abduction and Adduction
Focus: Hip abductors, adductors, and inner thigh
Starting Position: Client lies on their back with legs extended and relaxed.
Execution:
- Support the leg with both hands, one at the knee, one at the heel.
- Slowly slide the leg out to the side (abduction), then return it to the center (adduction).
- Keep the movement smooth, controlled, and within a pain-free range.
Coach Tip: This movement is particularly important for post-hip-surgery clients. Move slowly and watch for any pinching or discomfort at the joint.
.avif)
Upper Body
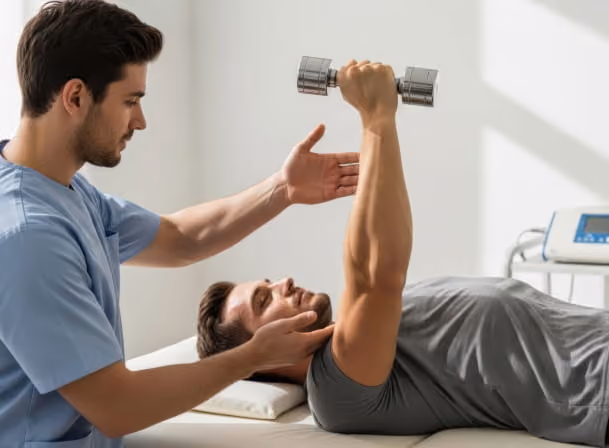
8. Passive Shoulder Flexion
Focus: Anterior shoulder, chest, and bicep
Starting Position: Client lies on their back with the arm at their side, palm facing inward.
Execution:
- Support the arm at the wrist and just above the elbow.
- Slowly raise the arm forward and upward, palm rotating toward the ceiling as it rises.
- Bring the arm as close to the ear as possible without forcing.
- Lower slowly and repeat.
Coach Tip: Always support the elbow joint above and below throughout the movement. Post-shoulder-surgery clients should begin at a very limited range and progress only with professional guidance.
9. Passive Shoulder Abduction
Focus: Lateral shoulder (deltoid) and rotator cuff
Starting Position: Client lies on their back with the arm at their side.
Execution:
- Support the arm at the wrist and above the elbow.
- Slowly move the arm outward to the side, palm rotating toward the ceiling as it rises.
- Aim to bring the arm in line with the shoulder.
- Lower slowly and repeat.
Coach Tip: Keep the motion smooth and pause immediately if the client reports any pinching or sharp pain. Shoulder abduction PROM is commonly used in rotator cuff recovery protocols.
10. Wrist Flexion and Extension
Focus: Wrist joint, forearm flexors, and extensors
Starting Position: Client rests their forearm on a flat surface or your supporting hand, with the hand hanging freely.
Execution:
- Support the wrist with one hand and hold the fingers gently with the other.
- Slowly bend the wrist forward (flexion), then backward (extension).
- Move through the full available range at a controlled pace.
- Perform 10 repetitions in each direction.
Coach Tip: Wrist PROM is particularly valuable for clients recovering from fractures, carpal tunnel surgery, or other conditions that restrict hand and forearm movement. Always stabilize the forearm throughout.
.avif)
PROM Safety Guidelines and Contraindications
PROM exercises are gentle by design, but they must be applied carefully. Follow these safety guidelines every session:
- Always respect the pain boundary: A mild stretch sensation is expected. Sharp, acute, or worsening pain is a signal to stop immediately and reassess.
- Never force a joint past its range of motion: PROM is not about pushing limits. The movement should be guided, not forced.
- Stabilize above and below the joint: Always support the limb on both sides of the joint being moved to avoid uncontrolled stress on surrounding structures.
- Progress gradually across sessions: Range-of-motion gains in rehabilitation are incremental. Consistent, gentle work over time produces better outcomes than aggressive single-session stretching.
Do not apply PROM in the following situations:
- Acute fractures or dislocations that have not been medically cleared
- Active joint infections or septic arthritis
- Immediately post-surgery without physician clearance
- When the client reports sharp or acute pain with any movement
- Deep vein thrombosis (DVT) in the affected limb
- Newly formed heterotopic ossification (bone formation in soft tissue)
Always refer clients with complex medical conditions to a licensed physical therapist or physician before incorporating PROM into their program.
How to Progress from PROM to Active ROM
PROM is the starting point, not the destination. The goal is to gradually transition clients toward active movement as healing allows.
A general progression model looks like this:
Phase 1: PROM only
The joint is moved entirely by the coach or therapist. The client remains passive. This is appropriate immediately post-surgery or with severe mobility restrictions.
Phase 2: Active-Assistive ROM (AAROM)
The client begins to engage their own muscles while the coach provides support and guidance. The client contributes what they can; the coach fills the gap.
Phase 3: Active ROM (AROM)
The client moves the joint independently through its full range using their own muscle activation. No external force is needed.
Phase 4: Resisted ROM and Strengthening
Once full active ROM is restored, progressive exercise programming begins to strengthen the muscles across that newly available range. This is where accessory exercises play a key role in supporting joint stability and functional performance.
Final Thoughts
Passive range-of-motion exercises are among the most underutilized tools in fitness and recovery programming.
When applied correctly, with the right dosage, the right technique, and the right client in mind, they protect joints, accelerate healing, prevent long-term complications, and lay the foundation for a full return to active movement.
As a coach, building PROM drills into your recovery and rehabilitation programs is not just a value-add; it's a necessity.
For clients coming out of surgery, managing a neurological condition, or working through a significant injury, it can be the difference between regaining full function and plateauing in partial recovery.
Use the 10 exercises in this guide as a starting point. Pair them with a clear progression plan, consistent session structure, and a deep understanding of passive range of motion principles, and you will be equipped to deliver recovery programming that genuinely changes outcomes for your clients.
Always consult a licensed healthcare professional before beginning any PROM program with clients who have an injury, surgical history, or medical condition.
Related Reading:
- Passive Range of Motion: Definition and Examples
- Active vs Passive Range of Motion: What Is the Difference and When to Use Each
- Passive Movement Explained: Definition, Examples, and Its Role in Physiotherapy Recovery
- Accessory Exercises: Definition, Examples, and Uses
- Exercise Progression Explained for Fitness Coaches
%20to%20Become%20a%20Certified%20Personal%20Trainer-min.avif)