




10 min read
TL;DR
- A proper pull-up starts from straight arms, takes your chin above the bar, and ends with a controlled descent.
- Cannot complete one yet? Use a box, resistance band, or assisted machine to train the full movement.
- Practice two or three times per week. Progress by using less assistance, adding clean repetitions, or introducing weight when your form stays steady.
Pull-ups look simple: grab a bar and pull yourself up. Then you try one. You squeeze your eyes shut, clench your teeth and pull with everything you have. Your legs start kicking, your face is scrunched up, and you are pulling so hard it feels like the bar should come down before your body goes up. But somehow, you are still hanging in almost the same spot.
That is usually when you realize that pulling harder is not the answer. You need to know what to work on first.
The good part? You do not need to be able to do a full pull-up to start training for one. And if you can already do a few, there are ways to make those reps stronger and more controlled.
In this guide, you’ll learn how to do a pull-up, what to work on if you cannot do one yet, and how to progress from your first rep to doing more.
How to Do a Pull-Up With Proper Form?
To do a proper pull-up form, hang from the bar with your palms facing forward. Pull your body up until your chin passes the bar, then lower yourself slowly until your arms are straight again.
Here is how the movement should look and feel.
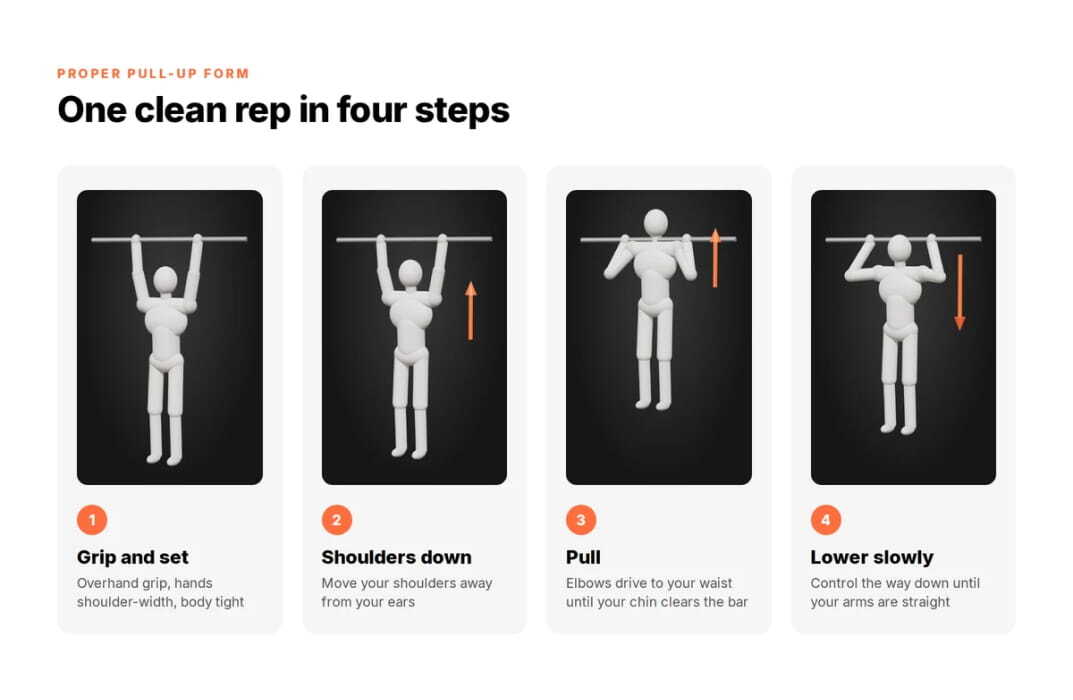
Step 1: Grip the Bar and Set Your Body
Stand directly under the pull-up bar. If you cannot reach it comfortably, use a sturdy exercise step or box.
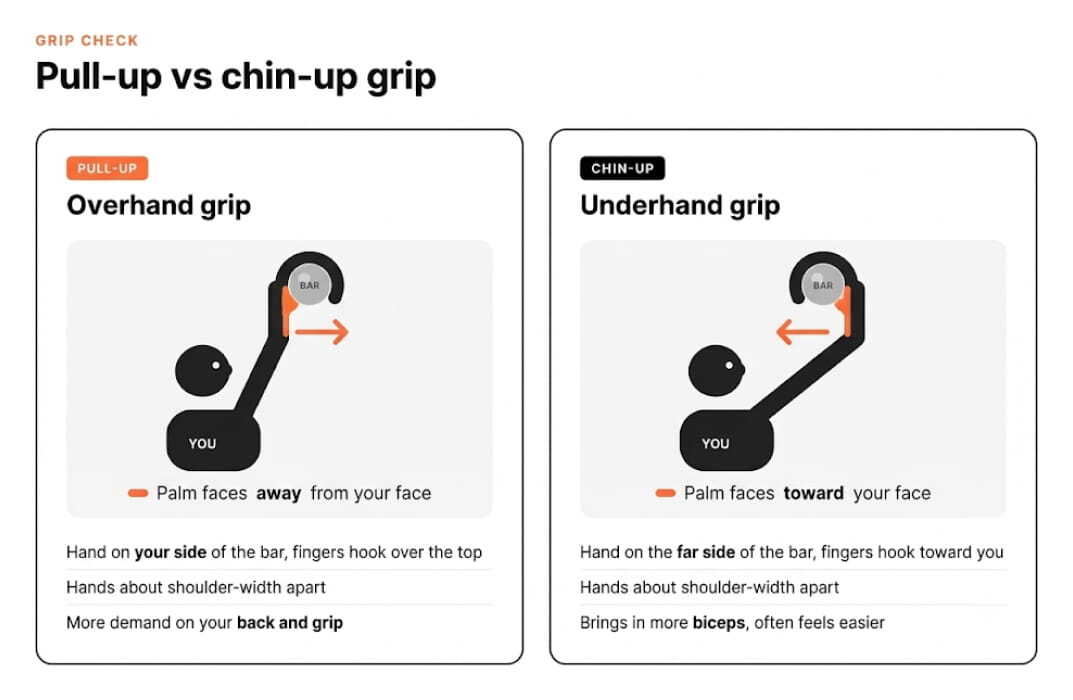
Use an overhand grip, with your palms facing away from your face and your hands about shoulder-width apart. This makes it a pull-up. If your palms face toward you, you are performing a chin-up.
Lift your feet from the step and straighten your arms. Keep your legs together, tighten your stomach and squeeze your glutes. Picture your body forming one steady line below the bar.
Step 2: Move Your Shoulders Away From Your Ears
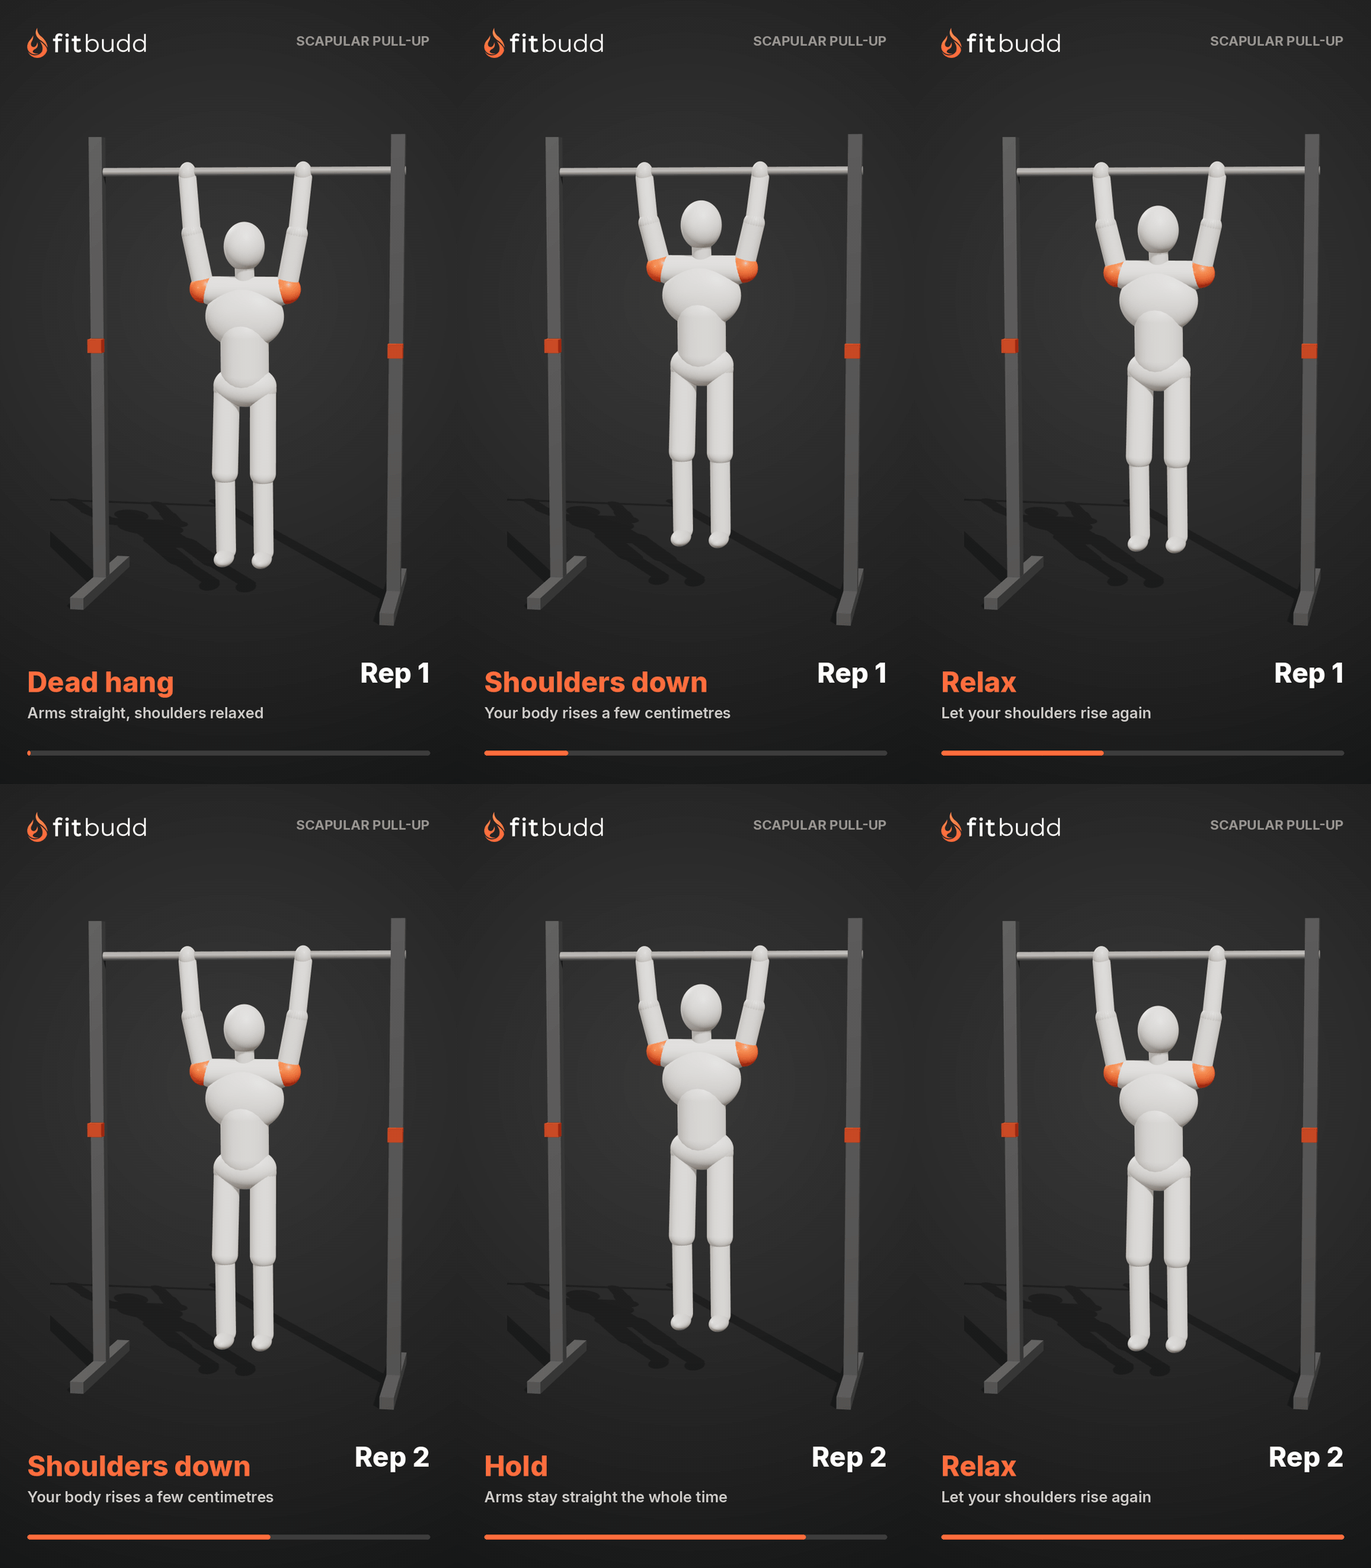
Before pulling, gently move your shoulders away from your ears. Your body may rise slightly while your arms remain straight.
Strength coach Mike Dewar, MA, CSCS, describes the cue simply: “Think about dropping your shoulders down away from your ears.”
Keep the movement small and natural. Do not force your shoulders down or squeeze them tightly together.
Step 3: Pull Your Chest Toward the Bar
Imagine pulling the bar down toward your upper chest. The bar will not move, so your body will rise instead.
As you pull, drive your elbows down toward your waist and keep them close to your sides. Your hands hold the bar, but your elbows lead the movement and lift your body.
Continue pulling until your chin passes the bar. Look forward and keep your neck relaxed. Don't tilt your chin up just to reach the top.
Step 4: Lower Yourself Slowly
Lower your body as if you are trying to stop gravity from pulling you down too quickly. Let your elbows straighten gradually until you return to the starting position.
Returning to straight arms completes the pull-up’s full range of motion. Place your feet back on the box if you need a break. If you continue the set, steady your body before starting the next repetition.
How Should You Breathe During a Pull-Up?
Take a breath before you begin. Breathe out as you pull your body toward the bar, then breathe in as you lower yourself.
If you catch yourself holding your breath or rushing, pause after the repetition and reset.
What Does One Proper Pull-Up Look Like?

What Pull-Up Mistakes Should You Avoid?
Most pull-up form mistakes happen when you rush the movement or continue after your muscles are too tired. Watch for these five while practicing.
- Swinging to Gain Momentum
.gif)
Swinging your hips and legs may help you reach the bar, but it takes the focus away from a pull-up. Tighten your stomach, keep your legs still, and wait for your body to settle before starting each repetition.
- Swinging to Gain Momentum
Swinging your hips and legs may help you reach the bar, but it takes the focus away from a pull-up. Tighten your stomach, keep your legs still, and wait for your body to settle before starting each repetition.
- Performing Half Repetitions
Starting with bent arms or stopping before your chin clears the bar shortens the movement. Use a resistance band, assisted pull-up machine, or foot support if you cannot yet complete the full pull-up.
- Reaching With Your Chin
Tilting your head back and lifting your neck upwards can create an illusion that your chin has cleared the bar. Instead, bring your upper body closer to the bar.
- Kicking or Twisting Your Lower Body
Kicking your feet or turning your hips makes the repetition harder to control. Keep your legs together and steady. You can bend your knees if the bar is too low, but keep your body balanced.
- Dropping From the Top
Releasing the movement as soon as your chin clears the bar removes the controlled, slow lowering phase. Lower yourself gradually until your arms are straight again.
What Muscles Do Pull-Ups Work?
It is easy to think of pull-ups as an arm exercise because you usually feel the burn in your arms.
But in reality, pull-ups work several muscle groups together:
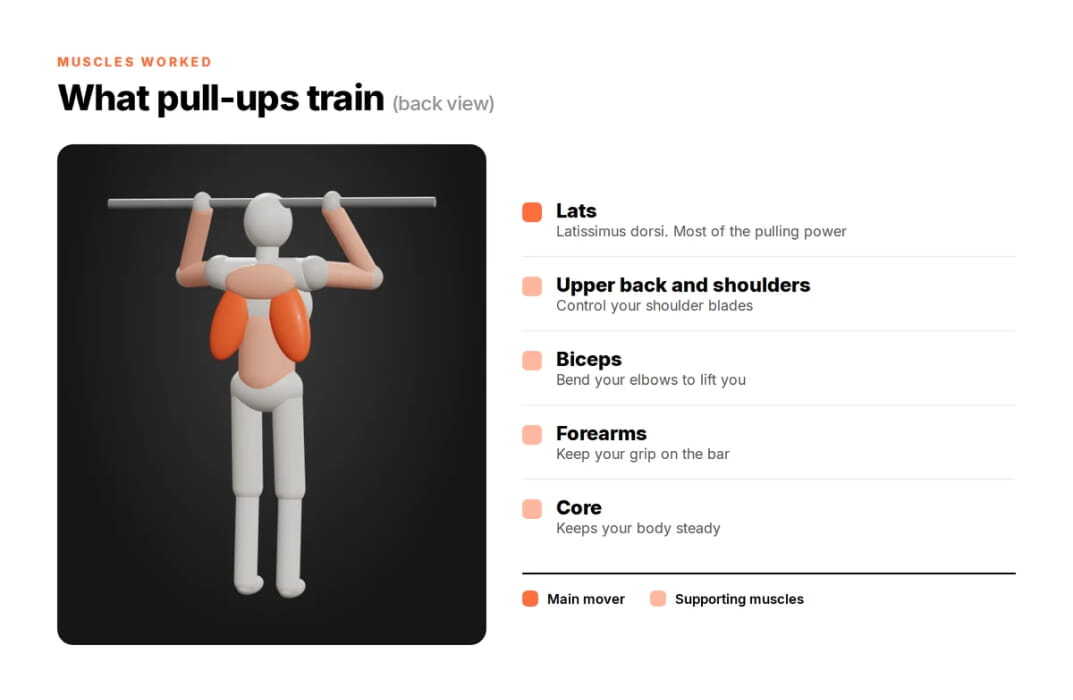
- Back: Your latissimus dorsi, or lats, provide much of the pulling power.
- Arms: Your biceps bend your elbows and help lift your body.
- Upper back and shoulders: These muscles control your shoulder blades as you move.
- Forearms: They maintain your grip while you hang from the bar.
- Core: Your abdominal muscles keep your body steady during the pull.
In a 2017 muscle-activation study, researchers used sensors to track eight shoulder, arm and forearm muscles during pull-ups. The results showed these muscles remained active throughout a full repetition.
Pull-ups strengthen your lats, upper back, biceps, and forearms while improving your grip and shoulder-blade control.
You may also feel a stretch through your lats and upper back. These benefits help you become better at climbing, calisthenics, and other harder bodyweight exercises.
What Is Your Pull-Up Starting Point?
Pulling with everything you have and not moving is frustrating. It can make you wonder whether you are strong enough to do a pull-up.
But you are not failing. Either your grip or your shoulder-blade control may just need more practice. Find where the movement breaks down, then train that part directly.
One exerciser in a r/bodyweightfitness discussion could lift about 110 pounds on the lat pulldown machine while weighing about 176 pounds. Yet they still could not complete a pull-up:
“Whenever I try to pull-up, it seems as if my arms just won’t bend and allow me to lift my body up.”
Their experience shows why gym strength does not always translate directly to lifting your entire body.
If you want to know how to start doing pull-ups, choose the description closest to your current attempt.
Pull-ups require you to lift your own body, so your weight and proportions can affect how difficult they feel. You do not need to lose weight before starting. Use enough support to practice now, then reduce it as you become stronger.
How Should You Warm Up for Pull-Ups?
Warm up for pull-ups with five minutes of light activation exercises for your wrists, shoulders, grip, and back.
- Circle your wrists: Complete 10 slow circles in each direction.
- Move your shoulders: Perform 10 forward circles, 10 backward circles, and 10 controlled arm swings.
- Pull a light resistance band apart: Hold the band in front of your chest and stretch it outward for 10 repetitions.
- Use a supported hang: Hold the bar for 10 to 15 seconds while keeping your feet on a box. Complete two rounds.
- Practice the start of the pull: Keep your arms straight and move your shoulders away from your ears five times.
You should feel more comfortable on the bar, not exhausted. If the warm-up reduces your strength before training begins, shorten the hangs or use more support.
Stop the session if you feel sharp shoulder or elbow pain, tingling, or numbness. Persistent pain should be assessed by a qualified healthcare professional.
What Pull-Up Workout Plan Should You Follow?
Choose your track based on your current ability:
Both pull-up workouts train the same movement. Track A uses more assistance, while Track B helps you build repeatable clean repetitions.
If you are starting with Track A, complete Days 1 and 2 on non-consecutive days. Add Day 3 once you can recover without lingering shoulder, elbow, or grip soreness. If you already practice pull-ups, you can begin Track B with three non-consecutive days, such as Monday, Wednesday, and Saturday.
Exercise Key for Pull-Ups
Use this quick reference while following the plans:
.jpg)
- Supported hang: Hold the bar while your feet remain on a sturdy box.
- Dead hang: Hold the bar with your feet off the floor and your arms straight.
- Scapular pull-up: Keep your arms straight and move your shoulders away from your ears.
- Assisted pull-up: Use a band, machine, or foot support to reduce the weight you lift.
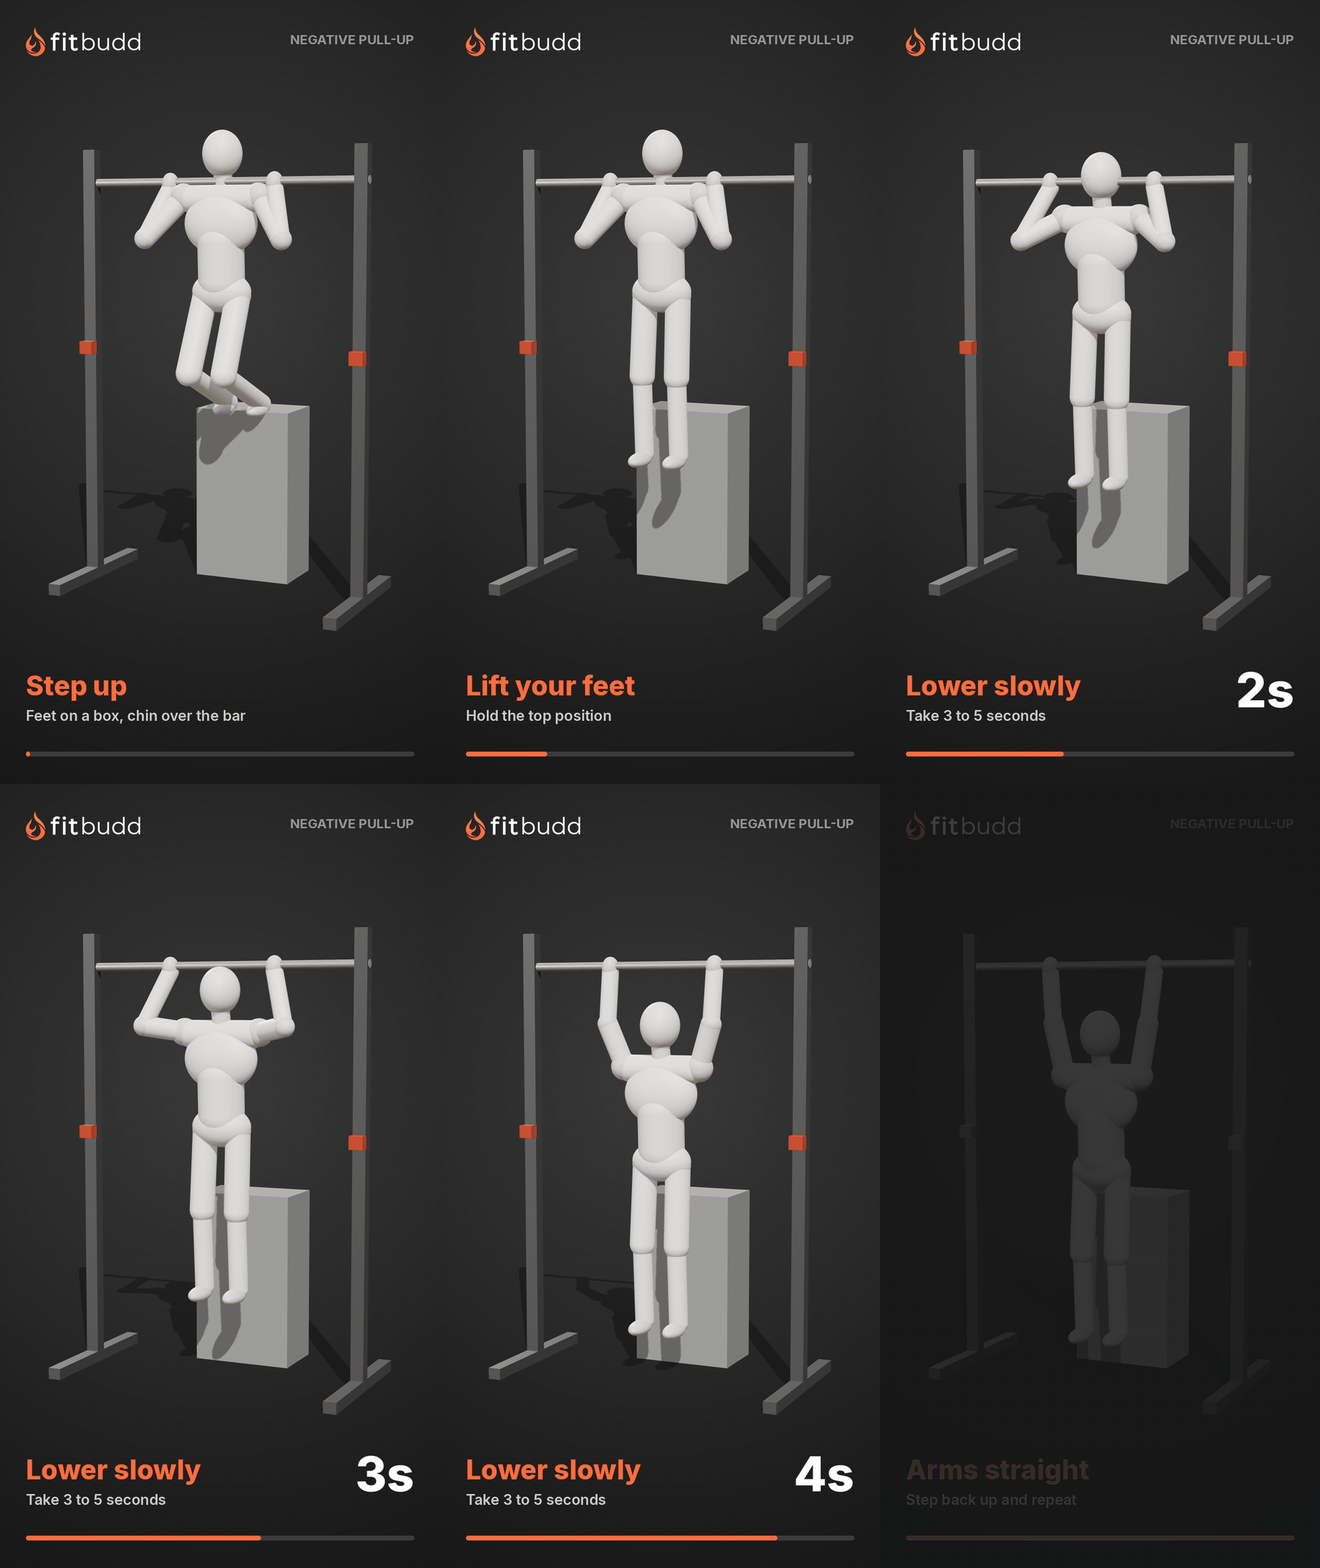
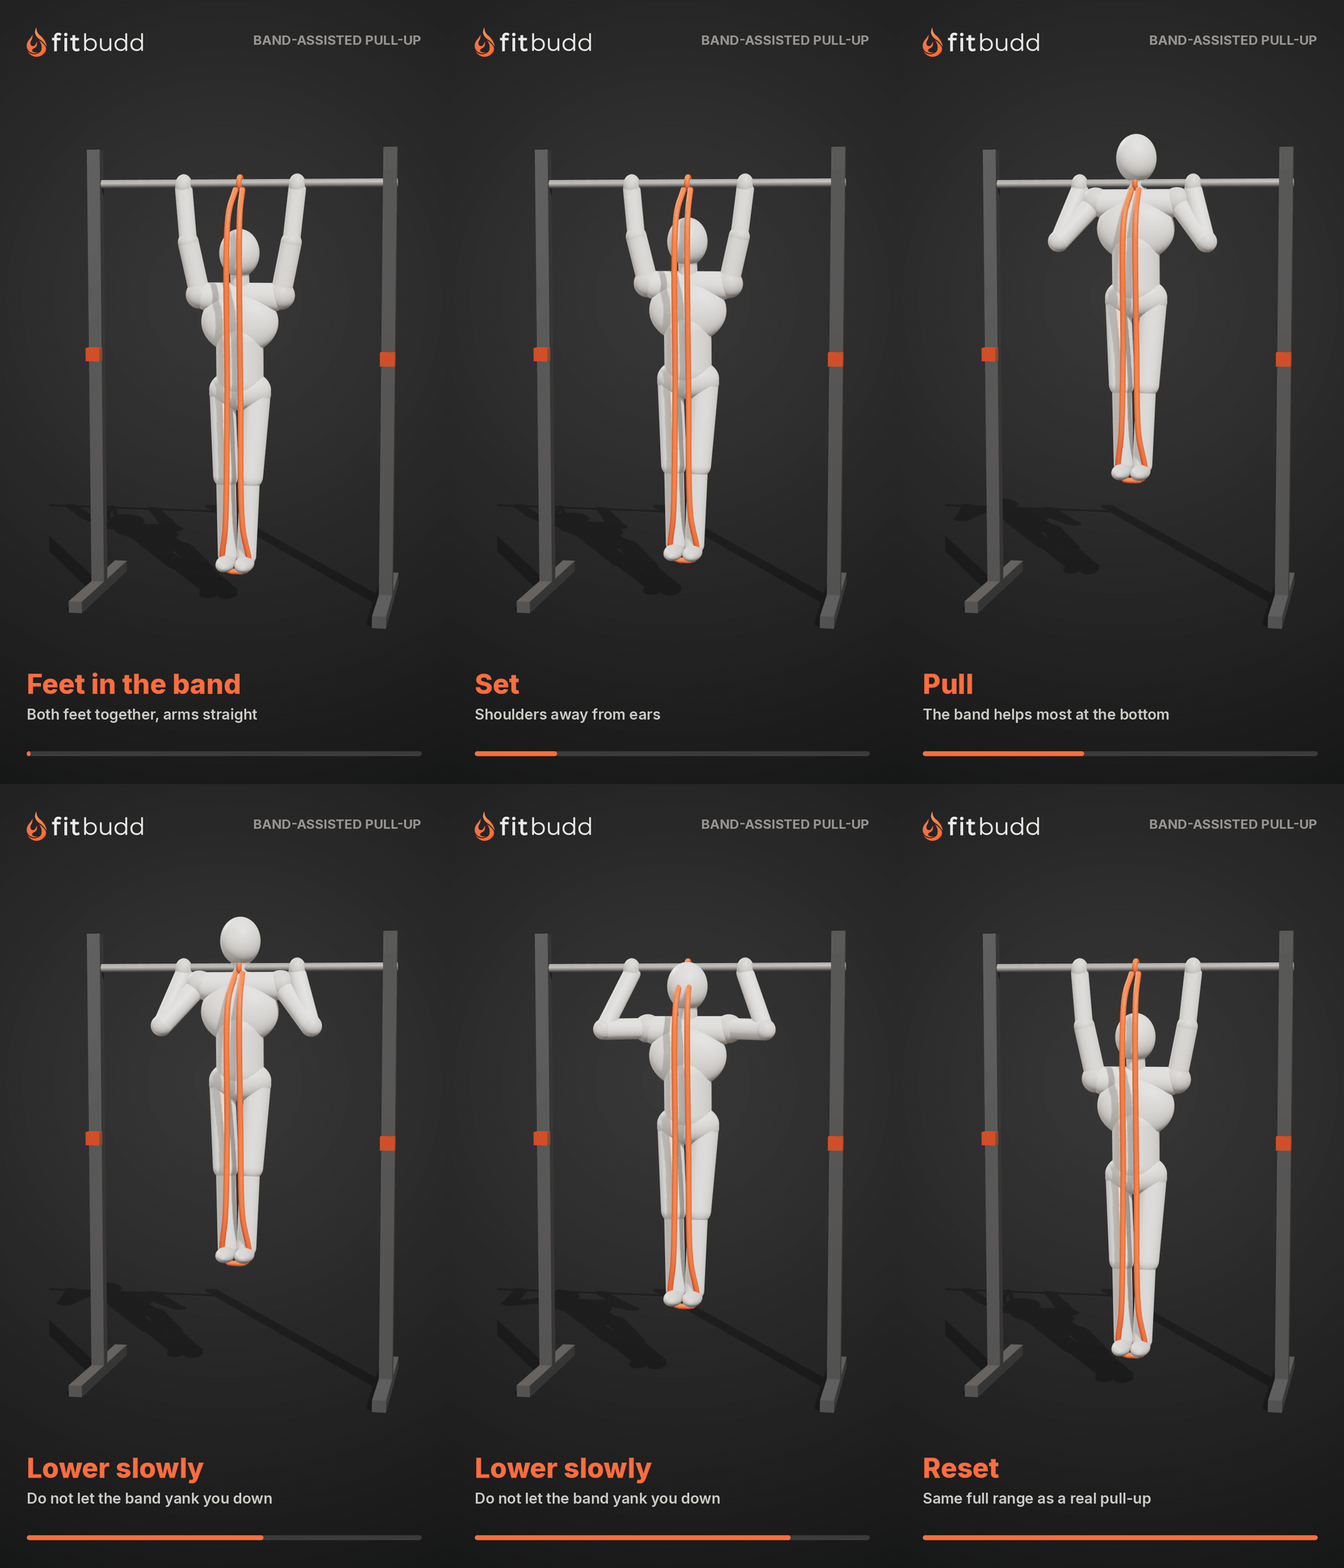
- Negative pull-up: Begin with your chin above the bar and lower yourself slowly.
- Inverted row: Lean back from a waist-height bar and pull your chest toward it.
Track A: Work Toward Your First Pull-Up
If you are close to your first pull-up, test one unassisted repetition after warming up on Day 3. Limit yourself to three rested attempts.
Track B: Build More Pull-Ups
Choose your repetitions based on the maximum number of clean pull-ups you can currently perform.
How Should You Track Your Pull-Up Plan?
Change only one variable at a time so you can see what is helping.
Record the exact band, machine setting, added weight, or foot support. Review the log weekly and look for improvements as you progress.
How Do You Get Better at Pull-Ups When Progress Stalls?
Once you can perform clean pull-ups, choose your next exercise progression based on your goal.
| Your Goal | Best Progression | How to Apply It |
|---|---|---|
| Perform more pull-ups | Increase total repetitions | Add one repetition to a set or complete one additional set. |
| Build more strength | Add external weight | Use a dip belt or weighted vest while keeping your repetitions controlled. |
| Build your back and arms | Increase training volume | Add repetitions or sets while maintaining the full range of motion. |
| Improve a weak position | Add a pause | Pause where you usually slow down, such as near the bottom or halfway up. |
| Improve control | Slow the descent | Pull at your normal speed, then take longer to lower yourself. |
| Develop pulling power | Use chest-to-bar pull-ups | Pull higher while keeping your body controlled and limiting momentum. |
| Prepare for advanced calisthenics |
%20to%20Become%20a%20Certified%20Personal%20Trainer-min.avif)